29 Nisan 2019

fluent api

https://www.tutorialspoint.com/entity_framework/entity_framework_fluent_api.htm


Fluent API is an advanced way of specifying model configuration that covers everything that data annotations can do in addition to some more advanced configuration not possible with data annotations. Data annotations and the fluent API can be used together, but Code First gives precedence to Fluent API > data annotations > default conventions.
  • Fluent API is another way to configure your domain classes.
  • The Code First Fluent API is most commonly accessed by overriding the OnModelCreating method on your derived DbContext.
  • Fluent API provides more functionality for configuration than DataAnnotations. Fluent API supports the following types of mappings.
In this chapter, we will continue with the simple example which contains Student, Course and Enrollment classes and one context class with MyContext name as shown in the following code.
using System.Data.Entity; 
using System.Linq; 
using System.Text;
using System.Threading.Tasks;  

namespace EFCodeFirstDemo {

   class Program {
      static void Main(string[] args) {}
   }
   
   public enum Grade {
      A, B, C, D, F
   }

   public class Enrollment {
      public int EnrollmentID { get; set; }
      public int CourseID { get; set; }
      public int StudentID { get; set; }
      public Grade? Grade { get; set; }
  
      public virtual Course Course { get; set; }
      public virtual Student Student { get; set; }
   }

   public class Student {
      public int ID { get; set; }
      public string LastName { get; set; }
      public string FirstMidName { get; set; }
  
      public DateTime EnrollmentDate { get; set; }
  
      public virtual ICollection<Enrollment> Enrollments { get; set; }
   }

   public class Course {
      public int CourseID { get; set; }
      public string Title { get; set; }
      public int Credits { get; set; }
  
      public virtual ICollection<Enrollment> Enrollments { get; set; }
   }

   public class MyContext : DbContext {
      public virtual DbSet<Course> Courses { get; set; }
      public virtual DbSet<Enrollment> Enrollments { get; set; }
      public virtual DbSet<Student> Students { get; set; }
   }

}   
To access Fluent API you need to override the OnModelCreating method in DbContext. Let’s take a look at a simple example in which we will rename the column name in student table from FirstMidName to FirstName as shown in the following code.
public class MyContext : DbContext {

   protected override void OnModelCreating(DbModelBuilder modelBuilder) {
      modelBuilder.Entity<Student>().Property(s  s.FirstMidName)
      .HasColumnName("FirstName");}

      public virtual DbSet<Course> Courses { get; set; }
      public virtual DbSet<Enrollment> Enrollments { get; set; }
      public virtual DbSet<Student> Students { get; set; }
}
DbModelBuilder is used to map CLR classes to a database schema. It is the main class and on which you can configure all your domain classes. This code centric approach to building an Entity Data Model (EDM) is known as Code First.
Fluent API provides a number of important methods to configure entities and its properties to override various Code First conventions. Below are some of them.

------------------------------------------------------

Fluent API lets you configure your entities or their properties, whether you want to change something about how they map to the database or how they relate to one another. There's a huge variety of mappings and modeling that you can impact using the configurations. Following are the main types of mapping which Fluent API supports −
  • Entity Mapping
  • Properties Mapping

Entity Mapping

Entity mapping is just some simple mappings that will impact Entity Framework's understanding of how the classes are mapped to the databases. All these we discussed in data annotations and here we will see how to achieve the same things using Fluent API.
  • So rather than going into the domain classes to add these configurations, we can do this inside of the context.
  • The first thing is to override the OnModelCreating method, which gives the modelBuilder to work with.

Default Schema

The default schema is dbo when the database is generated. You can use the HasDefaultSchema method on DbModelBuilder to specify the database schema to use for all tables, stored procedures, etc.
Let’s take a look at the following example in which admin schema is applied.
public class MyContext : DbContext {
   public MyContext() : base("name = MyContextDB") {}

   protected override void OnModelCreating(DbModelBuilder modelBuilder) {
      //Configure default schema
      modelBuilder.HasDefaultSchema("Admin");
   }
 
   public virtual DbSet<Course> Courses { get; set; }
   public virtual DbSet<Enrollment> Enrollments { get; set; }
   public virtual DbSet<Student> Students { get; set; }
}

Map Entity to Table

With default convention, Code First will create the database tables with the name of DbSet properties in the context class such as Courses, Enrollments and Students. But if you want different table names then you can override this convention and can provide a different table name than the DbSet properties, as shown in the following code.
protected override void OnModelCreating(DbModelBuilder modelBuilder) {

   //Configure default schema
   modelBuilder.HasDefaultSchema("Admin");

   //Map entity to table
   modelBuilder.Entity<Student>().ToTable("StudentData");
   modelBuilder.Entity<Course>().ToTable("CourseDetail");
   modelBuilder.Entity<Enrollment>().ToTable("EnrollmentInfo");
}
When the database is generated, you will see the tables name as specified in the OnModelCreating method.
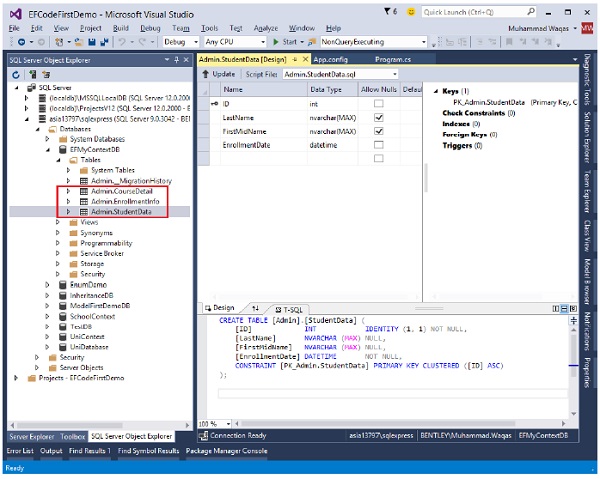
OnModel Method

Entity Splitting (Map Entity to Multiple Table)

Entity Splitting lets you combine data coming from multiple tables into a single class and it can only be used with tables that have a one-to-one relationship between them. Let’s take a look at the following example in which Student information is mapped into two tables.
protected override void OnModelCreating(DbModelBuilder modelBuilder) {
   //Configure default schema
   modelBuilder.HasDefaultSchema("Admin");

   //Map entity to table
   modelBuilder.Entity<Student>().Map(sd  {
      sd.Properties(p  new { p.ID, p.FirstMidName, p.LastName });
      sd.ToTable("StudentData");
   })

   .Map(si  {
      si.Properties(p  new { p.ID, p.EnrollmentDate });
      si.ToTable("StudentEnrollmentInfo");
   });

   modelBuilder.Entity<Course>().ToTable("CourseDetail");
   modelBuilder.Entity<Enrollment>().ToTable("EnrollmentInfo");
}
In the above code, you can see that Student entity is split into the following two tables by mapping some properties to StudentData table and some properties to StudentEnrollmentInfo table using Map method.
  • StudentData − Contains Student FirstMidName and Last Name.
  • StudentEnrollmentInfo − Contains EnrollmentDate.
When the database is generated you see the following tables in your database as shown in the following image.
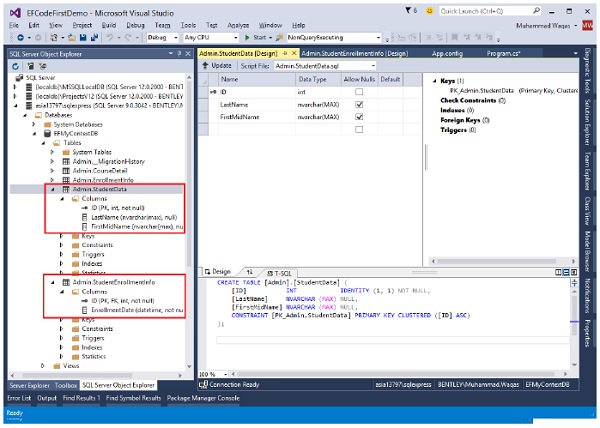
Entity Splitting

Properties Mapping

The Property method is used to configure attributes for each property belonging to an entity or complex type. The Property method is used to obtain a configuration object for a given property. You can also map and configure the properties of your domain classes using Fluent API.

Configuring a Primary Key

The default convention for primary keys are −
  • Class defines a property whose name is “ID” or “Id”
  • Class name followed by “ID” or “Id”
If your class doesn’t follow the default conventions for primary key as shown in the following code of Student class −
public class Student {
   public int StdntID { get; set; }
   public string LastName { get; set; }
   public string FirstMidName { get; set; }
   public DateTime EnrollmentDate { get; set; }
 
   public virtual ICollection<Enrollment> Enrollments { get; set; }
}
Then to explicitly set a property to be a primary key, you can use the HasKey method as shown in the following code −
protected override void OnModelCreating(DbModelBuilder modelBuilder) {
   //Configure default schema
   modelBuilder.HasDefaultSchema("Admin");
 
   // Configure Primary Key
   modelBuilder.Entity<Student>().HasKey(s  s.StdntID); 
}

22 Nisan 2019

Siz Çeviriyorsunuz


Aşağıdaki slaytları Türkçeye çevirip alpimrek@gmail.com a  Adınız, Soyadınız ve Öğrenci Numaranız ile eposta atıyorsunuz


17 Mart 2019

MVC Framework - Introduction

https://www.tutorialspoint.com/mvc_framework/mvc_framework_introduction.htm
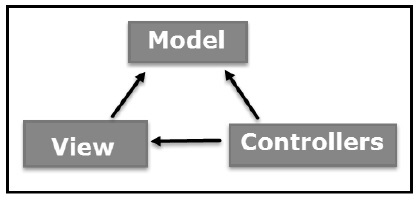
The Model-View-Controller (MVC) is an architectural pattern that separates an application into three main logical components: the model, the view, and the controller. Each of these components are built to handle specific development aspects of an application. MVC is one of the most frequently used industry-standard web development framework to create scalable and extensible projects.

MVC Components

Following are the components of MVC −
Model View Controller

Model

The Model component corresponds to all the data-related logic that the user works with. This can represent either the data that is being transferred between the View and Controller components or any other business logic-related data. For example, a Customer object will retrieve the customer information from the database, manipulate it and update it data back to the database or use it to render data.

View

The View component is used for all the UI logic of the application. For example, the Customer view will include all the UI components such as text boxes, dropdowns, etc. that the final user interacts with.

Controller

Controllers act as an interface between Model and View components to process all the business logic and incoming requests, manipulate data using the Model component and interact with the Views to render the final output. For example, the Customer controller will handle all the interactions and inputs from the Customer View and update the database using the Customer Model. The same controller will be used to view the Customer data.

ASP.NET MVC

ASP.NET supports three major development models: Web Pages, Web Forms and MVC (Model View Controller). ASP.NET MVC framework is a lightweight, highly testable presentation framework that is integrated with the existing ASP.NET features, such as master pages, authentication, etc. Within .NET, this framework is defined in the System.Web.Mvc assembly. The latest version of the MVC Framework is 5.0. We use Visual Studio to create ASP.NET MVC applications which can be added as a template in Visual Studio.

ASP.NET MVC Features

ASP.NET MVC provides the following features −
  • Ideal for developing complex but lightweight applications.
  • Provides an extensible and pluggable framework, which can be easily replaced and customized. For example, if you do not wish to use the in-built Razor or ASPX View Engine, then you can use any other third-party view engines or even customize the existing ones.
  • Utilizes the component-based design of the application by logically dividing it into Model, View, and Controller components. This enables the developers to manage the complexity of large-scale projects and work on individual components.
  • MVC structure enhances the test-driven development and testability of the application, since all the components can be designed interface-based and tested using mock objects. Hence, ASP.NET MVC Framework is ideal for projects with large team of web developers.
  • Supports all the existing vast ASP.NET functionalities, such as Authorization and Authentication, Master Pages, Data Binding, User Controls, Memberships, ASP.NET Routing, etc.
  • Does not use the concept of View State (which is present in ASP.NET). This helps in building applications, which are lightweight and gives full control to the developers.
Thus, you can consider MVC Framework as a major framework built on top of ASP.NET providing a large set of added functionality focusing on component-based development and testing.

10 Mart 2019

An Informal Introduction to Python

https://docs.python.org/3/tutorial/introduction.html

Using the Python Interpreter

https://docs.python.org/3/tutorial/interpreter.html

2.1. Invoking the Interpreter

The Python interpreter is usually installed as /usr/local/bin/python3.7 on those machines where it is available; putting /usr/local/bin in your Unix shell’s search path makes it possible to start it by typing the command:
python3.7
to the shell. [1] Since the choice of the directory where the interpreter lives is an installation option, other places are possible; check with your local Python guru or system administrator. (E.g., /usr/local/python is a popular alternative location.)
On Windows machines, the Python installation is usually placed in C:\Python37, though you can change this when you’re running the installer. To add this directory to your path, you can type the following command into the command prompt in a DOS box:
set path=%path%;C:\python37
Typing an end-of-file character (Control-D on Unix, Control-Z on Windows) at the primary prompt causes the interpreter to exit with a zero exit status. If that doesn’t work, you can exit the interpreter by typing the following command: quit().
The interpreter’s line-editing features include interactive editing, history substitution and code completion on systems that support readline. Perhaps the quickest check to see whether command line editing is supported is typing Control-P to the first Python prompt you get. If it beeps, you have command line editing; see Appendix Interactive Input Editing and History Substitution for an introduction to the keys. If nothing appears to happen, or if ^P is echoed, command line editing isn’t available; you’ll only be able to use backspace to remove characters from the current line.
The interpreter operates somewhat like the Unix shell: when called with standard input connected to a tty device, it reads and executes commands interactively; when called with a file name argument or with a file as standard input, it reads and executes a script from that file.
A second way of starting the interpreter is python -c command [arg] ..., which executes the statement(s) in command, analogous to the shell’s -c option. Since Python statements often contain spaces or other characters that are special to the shell, it is usually advised to quote command in its entirety with single quotes.
Some Python modules are also useful as scripts. These can be invoked using python -m module [arg] ..., which executes the source file for module as if you had spelled out its full name on the command line.
When a script file is used, it is sometimes useful to be able to run the script and enter interactive mode afterwards. This can be done by passing -i before the script.
All command line options are described in Command line and environment.

2.1.1. Argument Passing

When known to the interpreter, the script name and additional arguments thereafter are turned into a list of strings and assigned to the argv variable in the sys module. You can access this list by executing import sys. The length of the list is at least one; when no script and no arguments are given, sys.argv[0] is an empty string. When the script name is given as '-' (meaning standard input), sys.argv[0] is set to '-'. When -c command is used, sys.argv[0] is set to '-c'. When -m module is used, sys.argv[0] is set to the full name of the located module. Options found after -c command or -m module are not consumed by the Python interpreter’s option processing but left in sys.argv for the command or module to handle.

2.1.2. Interactive Mode

When commands are read from a tty, the interpreter is said to be in interactive mode. In this mode it prompts for the next command with the primary prompt, usually three greater-than signs (>>>); for continuation lines it prompts with the secondary prompt, by default three dots (...). The interpreter prints a welcome message stating its version number and a copyright notice before printing the first prompt:
$ python3.7
Python 3.7 (default, Sep 16 2015, 09:25:04)
[GCC 4.8.2] on linux
Type "help", "copyright", "credits" or "license" for more information.
>>>
Continuation lines are needed when entering a multi-line construct. As an example, take a look at this if statement:
>>>
>>> the_world_is_flat = True
>>> if the_world_is_flat:
...     print("Be careful not to fall off!")
...
Be careful not to fall off!
For more on interactive mode, see Interactive Mode.

2.2. The Interpreter and Its Environment

2.2.1. Source Code Encoding

By default, Python source files are treated as encoded in UTF-8. In that encoding, characters of most languages in the world can be used simultaneously in string literals, identifiers and comments — although the standard library only uses ASCII characters for identifiers, a convention that any portable code should follow. To display all these characters properly, your editor must recognize that the file is UTF-8, and it must use a font that supports all the characters in the file.
To declare an encoding other than the default one, a special comment line should be added as the first line of the file. The syntax is as follows:
# -*- coding: encoding -*-
where encoding is one of the valid codecs supported by Python.
For example, to declare that Windows-1252 encoding is to be used, the first line of your source code file should be:
# -*- coding: cp1252 -*-
One exception to the first line rule is when the source code starts with a UNIX “shebang” line. In this case, the encoding declaration should be added as the second line of the file. For example:
#!/usr/bin/env python3
# -*- coding: cp1252 -*-

Whetting Your Appetite : iştahınızı kabartmak

https://docs.python.org/3/tutorial/appetite.html

iştah açıcı sizde..

...devamı

This tutorial introduces the reader informally to the basic concepts and features of the Python language and system. It helps to have a Python interpreter handy for hands-on experience, but all examples are self-contained, so the tutorial can be read off-line as well.
For a description of standard objects and modules, see The Python Standard Library. The Python Language Reference gives a more formal definition of the language. To write extensions in C or C++, read Extending and Embedding the Python Interpreter and Python/C API Reference Manual. There are also several books covering Python in depth.
This tutorial does not attempt to be comprehensive and cover every single feature, or even every commonly used feature. Instead, it introduces many of Python’s most noteworthy features, and will give you a good idea of the language’s flavor and style. After reading it, you will be able to read and write Python modules and programs, and you will be ready to learn more about the various Python library modules described in The Python Standard Library.

19 Şubat 2019

Implementation

https://en.wikipedia.org/wiki/Implementation
Implementation is the realization of an application, or execution of a plan, idea, modeldesignspecificationstandardalgorithm, or policy.

Computer science[edit]

In computer science, an implementation is a realization of a technical specification or algorithm as a programsoftware component, or other computer system through computer programming and deployment. Many implementations may exist for a given specification or standard. For example, web browsers contain implementations of World Wide Web Consortium-recommended specifications, and software development tools contain implementations of programming languages.
A special case occurs in object-oriented programming, when a concrete class implements an interface; in this case the concrete class is an implementation of the interface and it includes methods which are implementations of those methods specified by the interface.

Pseudocode

https://en.wikiversity.org/wiki/Pseudocode
Pseudocode is an informal high-level description of the operating principle of a computer program or other algorithm. It uses the structural conventions of a normal programming language, but is intended for human reading rather than machine reading. Pseudocode typically omits details that are essential for machine understanding of the algorithm, such as variable declarations, system-specific code and some subroutines. The purpose of using pseudocode is that it is easier for people to understand than conventional programming language code, and that it is an efficient and environment-independent description of the key principles of an algorithm. No standard for pseudocode syntax exists, as a program in pseudocode is not an executable program.

Pseudocode example

Python

https://docs.python.org/3/tutorial/
Python is an easy to learn, powerful programming language. It has efficient high-level data structures and a simple but effective approach to object-oriented programming. Python’s elegant syntax and dynamic typing, together with its interpreted nature, make it an ideal language for scripting and rapid application development in many areas on most platforms.
The Python interpreter and the extensive standard library are freely available in source or binary form for all major platforms from the Python Web site, https://www.python.org/, and may be freely distributed. The same site also contains distributions of and pointers to many free third party Python modules, programs and tools, and additional documentation.
The Python interpreter is easily extended with new functions and data types implemented in C or C++ (or other languages callable from C). Python is also suitable as an extension language for customizable applications.

13 Şubat 2019

Interface : Arayüz

/*
Interface : Arayüz
Javada arayüz/interface ler bir sınıfta olması gereken metot ve alanları
belirleyen yapılardır.Uygulamada, problemin çözümü için yazılan farklı
nesnelerin bir arada çalışabilmeleri(kompozisyon) için ortak noktalara(alan/metot)
sahip olmaları gerekir. Örneğin her sınıfın "No" gibi bir alana yada toString()
gibi bir metoda sahip olması istenebilir.

Javada kalıtım yolu sadece tek bir sınıfın özellikleri başka bir sınıfa
aktarılabilir.  Çoklu kalıtım Java dilinde mevcut değil. Java mühendisleri
basitliği korumak için  çoklu kalıtımı Javaya dahil etmemişlerdir. Onun yerine
arayüz tanımlamalarının kullanılmasını önermişlerdir.

Arayüzler sabit değişkenler ve gövdesiz metot başlıkları dışında başka bir şey
barındımazlar.

PROTECTED :
Bir süper sınıfta protected olarak tanımlanmış değişkenler, metotlar, yapıcılar:
protected bildirilmiş üyenin sınıfının bulunduğu paketteki tüm sınıflardan
erişilebilir ve sadece diğer pakette tanımlanmış alt sınıftan erişilebilir.

Protected erişim belirleyici, sınıf ve arayüz tanımlamalarında kullanılamaz.
Metotlar, alanlar protected tanımlanabilir, ancak bir arayüz/interface içinde
metotlar ve alanlar protected yapılamaz.

Protected erişim, alt sınıfa, yardımcı metot veya değişkeni kullanma şansı
verirken,  ilişkisiz bir sınıfın onu kullanmaya çalışmasını önler.
Bu uygulamada interface "Karsilastirma.java" arayüzdür.

*/

Abstract Class : Özet(Soyut) Sınıf

/*
* Abstract Class : Özet(Soyut) Sınıf :
 * Sınıfların örnek alacağı sınıf şablonunu temsil eder.
 * Bir ebeveyn/super sınıftan türetilecek çocuk/alt sınıflarda
 * olması gereken üyeleri tanımlar.
 * Abstract kelimesi ile tanımlanan özet sınıflardan nesne yaratılamaz.
 * Özet sınıftan bir çocuk sınıf türetilmesi ve bu çocuk sınıftan
 * bir nesne yaratılması gerekir.
 * Bu sınıfın metotlarından bir tanesi abstract metod olarak tanımlanır,
 * gövdesi yazılmaz, alt sınıflarda oluşturulması beklenir.
   Özet/Soyut Sınıf Kısıtlamaları :
1- Özet sınıflardan alt özet sınıflar kalıtım yolu ile oluşturulabilir.
2- Özet metodu olmayan sınıflar özet sınıf olamazlar.
3- Sınıfın yapıcı metodu ve static metotlar özet metot olarak tanımlanamazlar
4- Özet sınıftan türeyen alt sınıflar türedikleri özet sınıfa ait özet metodun
   gövdesini yazmak zorundadırlar.

 final anahtar kelimesi ile tanımlanan sınıflardan alt sınıf türetilemez
 final ile tanımlanan metotlar alt sınıflarda override edilemez(private ve static
 tanımlı metotlar da aynı durum söz konusu)
 final ile tanımlı sınıfın metotları da override edilemez
 *
 * public final class kare{}
 * //final metot olusturma;
 * public final double alanHesapla();
 *
 * Sınıf Üyeleri : Class Members : Sınıfın alan/filed, properties/Özellik ve
 * Metotlarını kapsayan genel ifade.
*/

/**
 *
 final anahtar kelimesi ile tanımlanan sınıflardan alt sınıf türetilemez
 final ile tanımlanan metotlar alt sınıflarda override edilemez(private ve static tanımlı metotlar da aynı durum söz konusu)
 final ile tanımlı sınıfın metotları da override edilemez
 *
 * public final class kare{}
 * //final metot olusturma;
 * public final double alanHesapla();
 */

13 Aralık 2018

https://netbeans.org/kb/docs/ide/java-db.html

https://netbeans.org/kb/docs/ide/java-db.html

Working with the Java DB (Derby) Database

This document demonstrates how to set up a connection to Java DB database in NetBeans IDE. Once a connection is made, you can begin working with the database in the IDE, allowing you to create tables, populate them with data, run SQL statements and queries, and more.
The Java DB database is Sun's supported distribution of Apache Derby. Java DB is a fully transactional, secure, standards-based database server, written entirely in Java, and fully supports SQL, JDBC API, and Java EE technology. The Java DB database is packaged with the GlassFishapplication server, and is included in JDK 6 as well. For more information on Java DB database, consult the official documentation.
Contents
Content on this page applies to NetBeans IDE 7.2, 7.3, 7.4 and 8.0
To follow this tutorial, you need the following software and resources.
Software or ResourceVersion Required
NetBeans IDE7.2, 7.3, 7.4, 8.0, Java EE
Java Development Kit (JDK)Version 7 or 8
Java DBversion 10.4.x, 10.5.x
Note.
  • Java DB is installed when you install JDK 7 or JDK 8 (except on Mac OS X). If you are using Mac OS X you can download and installJava DB manually or use the Java DB that is installed by Java EE version of the NetBeans IDE installer.

Configuring the Database

If you have the GlassFish Server registered in your NetBeans IDE installation, Java DB will already be registered for you. Therefore, you can skip ahead to Starting the Server and Creating a Database.
If you downloaded the GlassFish server separately and need help registering it in NetBeans IDE, see Registering a GlassFish Server Instancein the IDE's Help Contents (F1).
If you just downloaded Java DB on its own, perform the following steps.
  1. Run the self-extracting file. A folder named 'javadb' will be created in the same location as the file. If you just downloaded Java DB and want to have the database server reside in a different location than where it was extracted to, you should relocate it now.
  2. On your system, create a new directory to be used as a home directory for the individual instances of the database server. For example, you can create this folder in the Java DB root directory (javadb) or in any other location.
Before continuing further, it is important to understand the components found in Java DB's root directory:
  • The demo subdirectory contains the demonstration programs.
  • The bin subdirectory contains the scripts for executing utilities and setting up the environment.
  • The javadoc subdirectory contains the API documentation that was generated from source code comments.
  • The docs subdirectory contains the Java DB documentation.
  • The lib subdirectory contains the Java DB jar files.

Registering the Database in NetBeans IDE

Now that the database is configured, perform the following steps to register Java DB in the IDE.
  1. In the Services window, right-click the Java DB Database node and choose Properties to open the Java DB Settings dialog box.
  2. For the Java DB Installation text field, enter the path to the Java DB root directory (javadb) that you specified in the previous step.
  3. For Database Location, use the default location if a location is already provided. Click OK
    For example, the default location might look like C:\Documents and Settings\username\.netbeans-derby on a Windows machine.
    Java DB settings dialog
    Note. If the Database Location field is empty you will need to set the path to the directory that contains your databases. You will need to create a directory for the databases if no directory exists.

Starting the Server and Creating a Database

The Java DB Database menu options are displayed when you right-click the Java DB node in the Services window. This contextual menu items allow you to start and stop the database server, create a new database instance, as well as register database servers in the IDE (as demonstrated in the previous step). To start the database server:
  1. In the Services window, right-click the Java DB node and choose Start Server. Note the following output in the Output window, indicating that the server has started:
    Output window display after starting the database server
  2. Right-click the Java DB node and choose Create Database to open the Create Java DB Database dialog.
  3. Type contact for the Database Name.
  4. Type nbuser for the User Name and Password. Click OK.
    Create Java DB Database dialog
    Note. The Database Location is the default location set during installation of Java DB from GlassFish. If you installed Java DB separately, this location might be different.

After you create the database, if you expand the Databases node in the Services window you can see that the IDE created a database connection and that the database was added to the list under the Java DB node.

03 Aralık 2018

https://www.cs.sfu.ca/CourseCentral/354/zaiane/material/postscript/Chapter2.pdf

 Attributes
It is possible to de ne a set of entities and the relationships among them in a number of di erent ways. The main difference is in how we deal with attributes.
Consider the entity set employee with attributes employee-name and phone-number.
We could argue that the phone be treated as an entity itself, with attributes phone-number and location.
Then we have two entity sets, and the relationship set EmpPhn de ning the association between employees and their phones.
This new de nition allows employees to have several (or zero) phones.
New de nition may more accurately re ect the real world.

Mapping Cardinalities: express the number of entities to which another entity can be associated via a relationship. For binary relationship sets between entity sets A and B, the mapping cardinality must be one of:
1. One-to-one: An entity in A is associated with at most one entity in B, and an entity in B is associated with at most one entity in A. (Figure 2.3)
2. One-to-many: An entity in A is associated with any number in B. An entity in B is associated with at most one entity in A. (Figure 2.4)
3. Many-to-one: An entity in A is associated with at most one entity in B. An entity in B is associated with any number in A. (Figure 2.5)
4. Many-to-many: Entities in A and B are associated with any number from each other.

Existence Dependencies:
if the existence of entity X depends on the existence of entity Y, then X is said to be existence dependent on Y.
(Or we say that Y is the dominant entity and X is the subordinate entity.)
For example,
{ Consider account and transaction entity sets, and a relationship log between them.
{ This is one-to-many from account to transaction.
{ If an account entity is deleted, its associated transaction entities must also be deleted.
{ Thus account is dominant and transaction is subordinate.

05 Kasım 2018

Definition - What does Tuple (Database) mean?
In the context of relational databases, a tuple is one record (one row). The information in a database can be thought of as a spreadsheet, with columns (known as fields or attributes) representing different categories of information, and tuples (rows) representing all the information from each field associated with a single record.

Tanım - Tuple (Veritabanı) ne anlama geliyor?
İlişkisel veritabanları bağlamında, bir tuple bir kayıttır (bir satır). Veritabanındaki bilgiler, farklı bilgi kategorilerini temsil eden sütunlar (alanlar veya özellikler olarak bilinir) ve tek bir kayıtla ilişkilendirilen her alandan tüm bilgileri temsil eden tupler (satırlar) ile birlikte bir elektronik tablo olarak düşünülebilir.
A relationship is an association among two or more entities.

For example, we may have the relationship that Attishoo works in the pharmacy department.

As with entities, we may wish to collect a set of similar relationships into a relationship set. A relationship set can be thought of as a set of n-tuples.

Each n-tuple denotes a relationship involving n entities e1 through en, where entity ei is in entity set Ei.
In Figure 2.2 we show the relationship set Works_In, in which each relationship indicates a department in which an employee works. Note that several relationship sets might involve the same entity sets. For example, we could also have a Manages relationship set involving Employees and Departments.

A relationship can also have descriptive attributes. Descriptive attributes are used to record information about the relationship, rather than about any one of the participating entities; for example, we may wish to record that At- tishoo works in the pharmacy department as of January 1991.

Bir ilişki, iki veya daha fazla varlık arasındaki ortaklıktır..

Örneğin, Attishoo'nun eczane bölümünde çalıştığı ilişkiye sahip olabiliriz.

Varlıklarda olduğu gibi, bir ilişki kümesine, benzer ilişkileri toplamak isteyebiliriz. Bir ilişki seti n-tuples kümesi olarak düşünülebilir.

Her bir n-tuple, varlık ei nin, varlık kümesi Ei içinde yer alan,
e1 den en'e kadar n tane varlığı kapsayan bir ilişkiyi ifade eder.

Şekil 2.2'de, her bir ilişkinin bir çalışanın çalıştığı bir departmanı belirttiği Works_In ilişkisini gösteriyoruz. Birkaç ilişki kümesinin aynı varlık kümelerini içerebileceğini unutmayın. Örneğin, Çalışanları ve Bölümleri içeren bir Yöneten ilişki kümesine sahip olabiliriz.

Bir ilişki de tanımlayıcı özelliklere sahip olabilir. Tanımlayıcı özellikler ilişki hakkında bilgi kaydetmek için kullanılır,  örneğin, Attishoo’nun Ocak 1991’den itibaren eczane departmanında çalıştığını kayıt edebiliriz..

22 Ekim 2018

Entities attributes, and entity sets (22 Ekim 2018)
An entity is an object in the real world that is distinguishable from other objects. Examples include the following: the Green Dragonzord toy, the toy department, the manager of the toy department, the home address of the manager of the toy department. It is often useful to identify a collection of similar entities. Such a collection is called an entity set. Note that entity sets need not be disjoint; the collection of toy department employees and the collection of appliance department employees may both contain employee John Doe (who happens to work in both departments). We could also define an entity set called Employees that contains both the toy and appliance department employee sets.
An entity is described using a set of attributes. All entities in a given entity set have the same attributes; this is what we mean by similar. (This statement is an oversimplification, as we will see when we discuss inheritance hierarchies in Section 2.4.4, but it suffices for now and highlights the main idea.) Our choice of attributes reflects the level of detail at which we wish to represent information about entities. For example, the Employees entity set could use name, social security number (ssn), and parking lot (lot) as attributes. In this case we will store the name, social security number, and lot number for each employee. However, we will not store, say, an employee's address (or gender or age).
For each attribute associated with an entity set, we must identify a domain of possible values. For example, the domain associated with the attribute name of Employees might be the set of 20-character strings.1 As another example, if the company rates employees on a scale of 1 to 10 and stores ratings in a field called mting, the associated domain consists of integers 1 through 10. Further, for each entity set, we choose a key. A key is a minimal set of attributes whose values uniquely identify an entity in the set. There could be more than one candidate key; if so, we designate one of them as the primary key. For now we assume that each entity set contains at least one set of attributes that uniquely identifies an entity in the entity set; that is, the set of attributes contains a key. We revisit this point in Section 2.4.3.
The Employees entity set with attributes ssn, name, and lot is shown in Figure 2.1. An entity set is represented by a rectangle, and an attribute is represented by an oval. Each attribute in the primary key is underlined. The domain information could be listed along with the attribute name, but we omit this to keep the figures compact. The key is s.m.


Varlıklar, özellikler ve varlık kümeleri
Bir varlık, gerçek dünyada diğer nesnelerden ayırt edilebilen bir nesnedir. Örnekler arasında şunlar sayılabilir: Yeşil Dragonzord oyuncağı, oyuncak bölümü, oyuncak departmanının yöneticisi, oyuncak departmanının yöneticisinin ev adresi. Benzer varlıklar koleksiyonunu tanımlamak genellikle yararlıdır. Böyle bir koleksiyon bir varlık kümesi olarak adlandırılır. Varlık kümelerinin ayrılmaya ihtiyaç duymadığını unutmayın; oyuncak departmanı çalışanları topluluğu ve cihaz departmanı çalışanları topluluğunun her ikisi de çalışan John Doe'yu (her iki bölümde de görev yapan) içerebilir. Ayrıca, hem oyuncak hem de cihaz bölümü çalışan kümelerini içeren Çalışanlar adı verilen bir varlık grubu tanımlayabiliriz.
Bir varlık, bir dizi özellik kullanılarak tanımlanır. Belirli bir varlık kümesindeki tüm varlıklar aynı özelliklere sahiptir; benzer demekle kastettiğimiz budur. (Bu ifade, Bölüm 2.4.4'teki miras hiyerarşilerini ele aldığımızda göreceğimiz gibi, bir aşırı basitleştirmedir, ancak şu an için yeterlidir ve ana fikri vurgular.) Seçtiğimiz özellikler, varlıklar hakkındaki bilgiyi temsil etmek istediğimiz ayrıntı düzeyini yansıtır. Örneğin, çalışanlar kümesi, ad, sosyal güvenlik numarası (ssn) ve otopark hissesi (lot) özellik olarak kullanabilir. Bu durumda, her çalışan için adı, sosyal güvenlik numarası ve park yeri numarasını kayıtedeceğiz. Ancak, çalışanın adresini (veya cinsiyetini veya yaşını) saklamayız.
Bir varlık kümesi ile  ilişkilendirilmiş her bir özellik için, olası değerlerin bir domain(etki alanı) ini tanımlamalıyız. Örneğin, Çalışanların adı özelliği ile ilişkilendirilen etki alanı, 20 karakterlik string olabilir. Başka bir örnek olarak, şirket çalışanlarını 1 ile 10 arasında bir ölçekte derecelendirir ve mting olarak adlandırılan bir alanda derecelendirmeleri saklarsa,  ilgili etki alanı (domain) 1'den 10'a kadar olan tam sayılardan oluşur. Dahası, her varlık kümesi için bir anahtar seçeriz. Bir anahtar, değerleri kümedeki bir varlığı benzersiz olarak tanımlayan minimum özellik kümesidir. Birden fazla aday anahtarı olabilir; eğer öyleyse, bunlardan birini birincil anahtar olarak belirleriz. Şimdilik, her varlık kümesinin, varlık kümesindeki bir varlığı benzersiz olarak tanımlayan en az bir özellik kümesi içerdiğini varsayalım; Yani, özellikler kümesi bir anahtar içerir. Bu noktayı Bölüm 2.4.3'te yeniden ele alacağız.
Özellikler ssn, isim ve lot ile belirlenen çalışanlar, Şekil 2.1'de gösterilmiştir. Varlık kümesi bir dikdörtgenle temsil edilir ve bir özellik bir elips  ile temsil edilir. Birincil anahtardaki her bir özelliğin altı çizilir. Etki alanı bilgisi, özellik adıyla birlikte listelenebilir, ancak bu rakamları kompakt tutmak için bunu çıkarırız. Anahtar s.m. dir
The great successful men of the world have used their imaginations. They think ahead and create their mental picture. and then go to work materializing that picture in all its details, filling in here, adding a little there, altering this bit and that bit, but steadily building, steadily building.
Robert Collier
Dünyanın büyük başarılı adamları hayal güçlerini kullandılar.
İleriyi düşünürler ve düşencelerindeki resmi yaratırlar.
ve sonra tüm detaylarda bu resmi hayata geçirmek için çalışırlar.
beriyi doldururlar, biraz öteye eklerler ve bit bit değiştirirler
ama kararlı bir şekilde inşaa ederler, sürekli inşaa ederler.

15 Ekim 2018

Data Administration: 
When several users share the data, centralizing the administration of data can offer significant improvements. Experienced professionals who understand the nature of the data being managed, and how different groups of users use it, can be responsible for organizing the data representation to minimize redundancy and for fine-tuning the storage of the data to make retrieval efficient.

08 Ekim 2018

ADVANTAGES OF A DBMS

ADVANTAGES OF A DBMS
Using a DBMS to manage data has many advantages:
I
Data Independence: Application programs should not, ideally, be exposed to details of data representation and storage, The DBMS provides an abstract view of the data that hides such details.
Veri Bağımsızlığı:
Uygulama programları ideal olarak veri temsili ve depolama ayrıntılarına maruz bırakılmamalıdır.
DBMS, bu ayrıntıları saklayan verilerin soyut bir görünümünü sağlar.
II
Efficient Data Access: A DBMS utilizes a variety of sophisticated techniques to store and retrieve data efficiently. This feature is especially important if the data is stored on external storage devices.
Verimli Veri Erişimi:
Bir DBMS, verileri verimli bir şekilde depolamak ve almak için çeşitli karmaşık teknikler kullanır. Bu özellik, veriler harici depolama cihazlarında saklanırsa özellikle önemlidir.
II
Data Integrity and Security: If data is always accessed through the DBMS, the DBMS can enforce integrity constraints. For example, before inserting salary information for an employee, the DBMS can check that the department budget is not exceeded. Also, it can enforce access controls that govern what data is visible to different classes of users.
Veri Bütünlüğü ve Güvenlik: Verilere her zaman DBMS aracılığıyla erişilirse, DBMS bütünlük kısıtlamalarını uygulayabilir. Örneğin, bir çalışan için maaş bilgilerini eklemeden önce, DBMS departman bütçesinin aşılmadığını kontrol edebilir. Ayrıca, farklı kullanıcı sınıflarına hangi verilerin görülebileceğini yöneten erişim kontrollerini de uygulayabilir.
II
Data Administration: When several users share the data, centralizing the administration of data can offer significant improvements. Experienced professionals who understand the nature of the data being managed, and how different groups of users use it, can be responsible for organizing the data representation to minimize redundancy and for fine-tuning the storage of the data to make retrieval efficient.
Veri Yönetimi :
Birkaç kullanıcı verileri paylaştığında,
veri yönetimini merkezileştirmek önemli gelişmeler sağlayabilir.
Yönetilen verilerin doğasını ve farklı kullanıcı gruplarının bunu
nasıl kullandığını anlayan deneyimli profesyoneller,
veri fazlalığı en aza indirmek için veri sunumunu organize etmekten
ve
verilerin verimli bir şekilde geri çağırılması için depolamanın
ince ayarından sorumlu olabilirler.
II
 Concurrent Access and Crash Recovery: A DBMS schedules concurrent accesses to the data in such a manner that users can think of the data as being accessed by only one user at a time. Further, the DBMS protects users from the effects of system failures.
II
Reduced Application Development Time: Clearly, the DBMS supports important functions that are common to many applications accessing data in the DBMS. This, in conjunction with the high-level interface to the data, facilitates quick application development. DBMS applications are also likely to be more robust than similar stand-alone applications because many important tasks are handled by the DBMS (and do not have to be debugged and tested in the application).
A database is a collection of data, typically describing the activities of one or more related organizations. For example, a university database might contain information about the following:
• Entities such as students, faculty, courses, and classrooms.
• Relationships between entities, such as students' enrollment in courses, faculty teaching courses, and the use of rooms for courses.
A database management system, or DBMS, is software designed to assist in maintaining and utilizing large collections ofdata. The need for such systems, as well as their use, is growing rapidly. The alternative to using a DBMS is to store the data in files and write application-specific code to manage it. The use of a DBMS has several important advantages, as we will see in Section 1.4.

Veri tabanı bir veri topluluğudur.
  Bir veya daha fazla ilgili kuruluşun faaliyetlerini tipik olarak açıklar.

  Örneğin, bir üniversite veri tabanı aşağıdakiler hakkında bilgi içerebilir:
• Öğrenciler, öğretim üyeleri, dersler ve sınıflar gibi varlıklar.

• Varlıklar arasındaki ilişkiler,
Öğrenciler derslere kayıt, fakülte öğretim kursları ve dersler için oda kullanımı gibi.

Bir veritabanı yönetim sistemi veya DBMS, büyük veri koleksiyonlarını
bakımına ve kullanımına yardımcı olmak için tasarlanmış bir
yazılımdır.
Bu tür sistemlere olan ihtiyaç,
hem de kullanımı hızla büyüyor.
Bir DBMS kullanmanın alternatifi, verileri dosyalarda saklamak ve yönetmek için uygulamaya özel kod yazmaktır. DBMS'nin kullanımı, Bölüm 1.4'te göreceğimiz gibi, bazı önemli avantajlara sahiptir.